
CONN BURANICZ
GRAPHICS TECH ARTIST
PERFORMANCE - SHADERS - CODING - PROCEDURAL TOOLS
Please note that I used the Nintendo characters just for fun while experimenting and demonstrating the toolset back during my WayForward days in 2015.
PART ONE
INTRODUCTION
The Photoshop File to 3DSMax Rig Toolset is a new pipeline that I’ve been experimenting with while working at WayForward. The toolset uses javascript and maxscript to convert Photoshop layers into a usable 3D skeletal rig in 3DSMax. While the scripts are still missing several features, I think as-is, the toolset shows a lot of promise as an automatic rigging tool for Animators and Riggers alike.
CHANGING RIGGING RULESET
During the later months of Shantae: Half Genie Hero, the majority of my time as a Tech Artist was devoted to the character rigs. After all, the game features 8 playable characters ( with unique movesets ) and over 100 NPCs and enemies. At WayForward, rigs are built according to individual animators’ needs; meaning that each rig is specifically crafted to what the assigned animator prefers. Because of frequent rigging process revisions and animator staff shifting, I had to relearn how animators wanted 2D rigs delivered several times. As a result, the Shantae team never had an established rigging process.
TALKING WITH ANIMATORS
At WayForward, Tech Artists and Animators have a meeting before every rig begins. We also consult the Director or other team members if the rig requires some very specific requests. In addition, Animators occasionally provide Photoshop files with bone placement and rig notes overlaying a render of the character. This part of the pipeline was established because of the frequent changes mentioned in the above section.
TRIAL AND ERROR
I’d like to mention the rigging assignment that inspired this new toolset. The Lazy Lagoon Boss was a 2D rig that went through four rerigging and reskinning passes. The Boss went through this many revisions because this was the first time I was working with the Animator on Shantae. In addition, the Animators reevaluated their preferences for the rig a few times, even halfway through a reskinning pass!
PART TWO
PURPOSE
As of when I’m writing this, the Photshop to Rig Toolset is meant for Animators ( or Riggers ) to create the initial foundation for Character or Prop rigs. Afterward, the Tech Artist or Rigger can fine tune the rig the rest of the way. Because Photshop is 2D, I also feel that this System works best for 2D characters and props ( such as in Shantae ). That said, I have challenged myself to make this system work for 3D rigs as well. Honestly though, placing and naming all the bones in Photoshop can sometimes take as much time as doing the same in 3DSMax. That’s why, at this time, I label the Photoshop File to 3DSMax Rig Toolset as more of a rapid prototyping, or layman system.

Rigging 2D characters in 3DSMax involves atlasing all the body parts, placing them on texture planes in 3DSMax, and adding edge loops and vertices for skinning.
I’m first going to demonstrate the Photshop to Rig Toolset on a 2D character. For my experiments, I’m using characters from Nintendo games. I chose Yoshi from Paper Mario because his pose and art style are similar to what I’ve been doing at WayForward. In 3DSMax, 2D characters are comprised of several 2D planes, each with a body part. This system is similar to puppet animation in After Effects or Flash.
RENDER OUT
The vast majority of user time is spent in Photoshop. However first, the character must be rendered out from 3DSMax. I simply go into the Front View and Print Screen. Before that though, since pixel resolution is not 1:1 with max units, I create a 1×1 box in the scene to act as a scale reference. For the javascript in Photoshop, one max unit is equal to the height of the scale reference in pixels.
LAYERS AND GROUPS
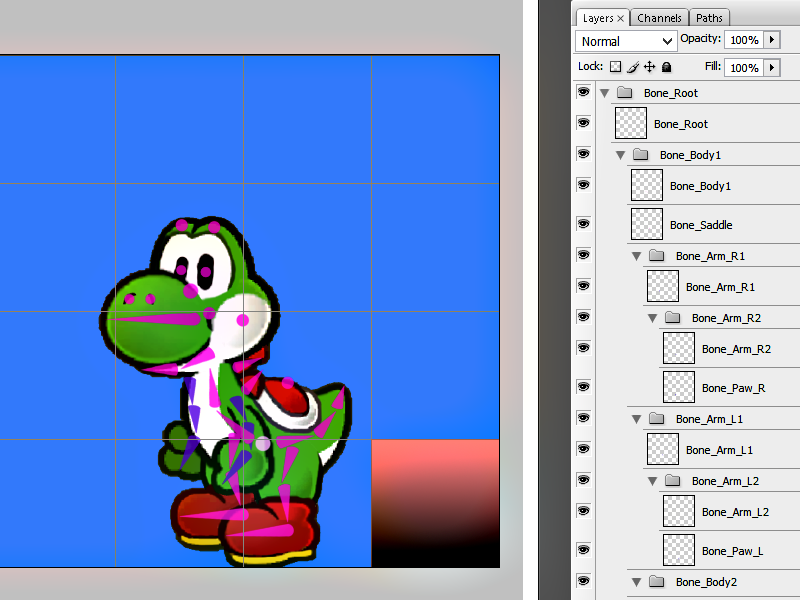
After the 2D character render is in Photoshop, its time to start placing bones. Simply draw bones where you where them on the rig! My Photoshop script records the name, XY position, and parent of each bone. Each layer counts as one bone.

The Layer and Group hierarchy in Photoshop will match the bone hierarchy in 3DSMax. The box on the bottom right corner is the pixel to max unit reference.
PARENTING
There are two methods of bone parenting with my script. All layers inside a group folder are the children of that folder. A layer sharing the same name as the group folder represents the parent bone. In addition, layers sharing the same name, but incremented, will be parented together in a descending order.
COLORING
Bone coloring is purely for the user’s convenience. As shown with Yoshi, 2D characters have a fixed perspective and therefore several of their body parts overlap. Using different colors will help make the bone topology clearer and make sure the shapes do not blend together.
BONE SHAPE AND DIRECTION
The Photoshop script recognizes bone type and direction based on its shape. By far, this was the most challenging portion of creating this toolset so far. If a bone’s height and width meet an equality threshold, its considered a point bone, and its direction will not be calculated. As for vector bones, its a two-step process. First, the bone’s base and tip are discovered by sampling four hemisphere selections. The tip is discerned based on which hemisphere has the most amount of alpha pixels. The opposite hemisphere is then considered the base. Second, the startPos and endPos is measure by sampling the edge row or columns of the tip and base. The script finds the opaque pixels and the start or end Pos is considered the middle of the opaque pixels.
TO 3DS MAX
Once all bones are drawn, labeled, and sorted; the user runs the script to record all the bone data onto an ini file. Then, in 3DSMax, users run my toolset’s maxscript. After the user is prompted to select an ini file, the script does the rest! It loops through the ini file and creates a bone ( including name, parent, and orientation ) based on information in each section.
PART THREE
BONE SHAPE AND DIRECTION
The Photoshop script recognizes bone type and direction based on its shape. By far, this was the most challenging portion of creating this toolset so far. If a bone’s height and width meet an equality threshold, its considered a point bone, and its direction will not be calculated. As for vector bones, its a two-step process. First, the bone’s base and tip are discovered by sampling four hemisphere selections. The tip is discerned based on which hemisphere has the most amount of alpha pixels. The opposite hemisphere is then considered the base. Second, the startPos and endPos is measure by sampling the edge row or columns of the tip and base. The script finds the opaque pixels and the start or end Pos is considered the middle of the opaque pixels.
SAME BUT MORE INVOLVED
Now that I’ve demonstrated the basics of the Photoshop File to 3DSMax Rig Toolset, I want to show how the system currently works for a 3D Character. It’s pretty much the same system, but we have to account for that pesky third dimension! For this demonstration, I’ve elected to use Mewtwo from Super Smash Bros because he’s a conventional biped, but with a few outlier features that are perfect for an animator to elaborate their preferences for.
FRONT AND SIDE
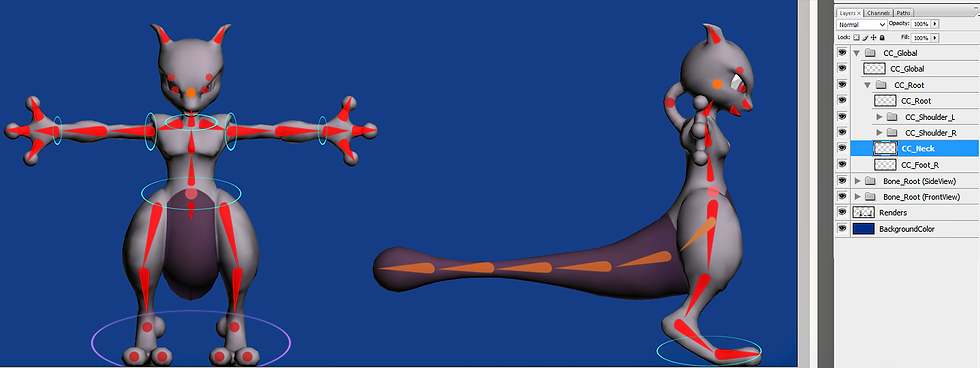
Since Photoshop is in 2D, I needed to come up with an intuitive way to allow bone placement in the Z coordinate as well as XY. So, for 3D characters, I render out both a Front View and Side View of the character. This will also make sure that users are able to place bones in places that cannot be seen from the front ( such as Mewtwo’s tail ). The Front View is for XY positioning while the Side View is YZ positioning.

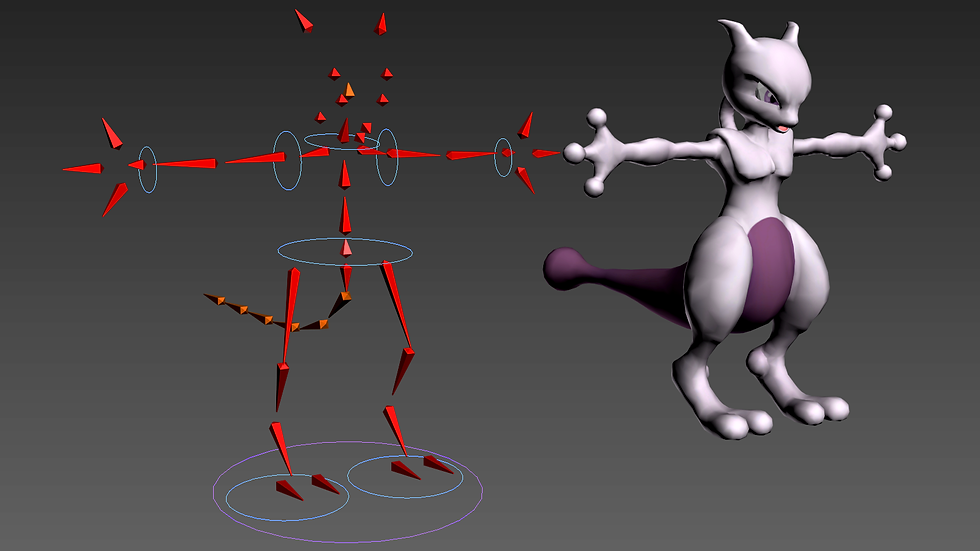
The javascript creates the ini file and the maxscript reads the data to recreate the bones as a 3D Rig. To the right, Yoshi is happy that the pipeline was a success!
CROSS REFERENCING
Each View has its own bone hierarchy. The downside is that many bone layers will have to be redrawn and re-positioned because of the new perceptive. The upside is that users don’t need to redo the whole hierarchy twice, just new bones and bones with specific Z direction. The javascript is run twice, once for each set of bones. Bones with matching names in the ini file are composite together, and the vector bones supplant point bones. There are still a few hiccups in that its sometimes difficult for the user to properly match up bones in both the Front and Side View to get the bones exactly in desired the XYZ position and direction. That’s why I stated this toolset is more reliable for 2D characters because only one perspective is needed. Even so, the the functionality for 3D characters is there anyway, if nothing than to just see that it’s possible!

The Front and Side View have their own Layer and Group Hierarchies. Notice how the Side View only contains new bones and bones that I wanted to specify the Z pos for.
CONTROL CURVES
While 2D Rigs can get away without Control Curves, 3D characters really benefit from them. At this point, only circle splines are recognized. Furthermore, the toolset only spawns the Controls into the 3DSMax scene, it does not provide them with full functionality. The javascript recognizes normal circles as facing the camera. Meanwhile, ovals represent 90 degree turns on the X or Y depending on if the circle has been squashed into an oval vertically or horizontally.
PART FOUR
MORE FEATURES
While I’m happy with this toolset, I know that it can become more than a rough draft tool with several additional features. I haven’t fully experimented with all of these, but I’m pretty confident that these features can be at least partially integrated into the scripts.

I offset the Rig so that all bones and controls would be visible. Please not that these rigs are only for demonstrating the tool, they are not fully functional and are missing many features.
Probably the most beneficial feature would be automatic skinning and painting weights. I could easily see paint weight layers being created for every bone in Photoshop. Users would paint over the character renders with gradients and those layers would be exported out as TGAs. The maxscript could then read the color data from the TGAs and use it to weight the nearest represented vertex to each bone. The question is whether painting weights in Photoshop is intuitive or convenient enough. It doesn’t seem like the results would be too accurate if the users could not see how the mesh is affected in real time. That said, I think Photoshop skinning can be most useful for body parts that are literally just a step ladder gradient between two bones ( such as a finger or tail )!
RECOGNIZING IK
Adding IKs and constraint features are the last things needed to represent the whole rigging process. The challenges are based on adapting the toolset to recognize every type of constraint and control functionality. Limb IKs are easy enough by placing markers for the start and end bones, but what about eyeballs with LookAt constraints or foot pivots etc. Overall, it’s about finding intuitive ways for users to represent specific IK or constraint function. Adding more complexity defeats the purpose of the toolset.
CONCLUSION
This project started when I was brainstorming for new things to demonstrate on my portfolio. Based on the roadblocks I encountered with Shantae animation, I really wanted to try and create a tool that would automate rigging for animators. If there is enough fanfare after more people try my Photoshop File to 3DSMax Rig Toolset, I’ll be sure to keep adding more and functionality. I’d say the biggest setback to this toolset is it’s potential redundancy; it might take almost as much work to set up the bones in Photoshop as it would in 3DSMax anyway. In the end though, I accomplished my initial goal, which was to see if this type of pipeline could be accomplished in the first place.