

CONN BURANICZ
GRAPHICS TECH ARTIST
PERFORMANCE - SHADERS - CODING - PROCEDURAL TOOLS

Stanford Dragon Quickly demonstrates the features of the Volumetric Hologram Shader that this Article will be presenting

Here's the Stanford Dragon with Volumetric Hologram rundown in Additive Blend Mode

Kakonrad Engine Test Room where Debug View makes it easy to see the Quads billboard to face camera, and cull based on the view too. Culled as Red, and Visible as Green
Stanford Dragon Quickly demonstrates the features of the Volumetric Hologram Shader that this Article will be presenting
INTRODUCTION
Here is a real-time technique that I developed for creating robust, performant Sci-Fi Holograms. It’s more than a mesh with a fancy shader, it’s driven by specialized meshes working in tandem to appear more dynamic than it actually is. The system is very portable too. I chose to keep the logic as Vertex and Fragment Shaders rather than Compute because I want to keep the shaders easily translatable to Material Graphs and other engines.
I’ve been authoring procedural generation content for my entire career, but my website never, until now, demonstrated any SideFX Houdini. That’s another major reason why I’m sharing this project with you here!
At the bottom of this article, a zip file is provided that shares the HDA and shader files for reference. I hope this article helps show a viable pipeline for game projects target 60 FPS or greater.
BALANCING CUTTING-EDGE WITH THE ACCESSIBLE
For AAA game dev, it’s very often a balance between pursuing ‘top-of-the-line” features vs. accessible/scalable features. Andy Gavin’s custom GOOL language for Jak and Daxter is badass...but can bespoke toolsets like that scale when working with a Team of 200+ people and several out-sourcing houses? At the same time, AAA games using the same middle-ware are in danger of feeling “cookie-cutter” without a unique feel. I hope this project showcases an agreeable balance; it’s unconventional, but the pipeline can easily be ported to another project by an Environment Artist. There are no structure buffers, all the data is encoded into the vertices.
WHY CALL IT VOLUMETRIC
Emissive, ‘glowing’ transparent objects are ubiquitous in videogames. For the Fantasy genre, shaders like these are used for ‘ghosts’ and ‘astral projections’ conjured up by some warlock. However, the Sci-Fi genre is where these effects really ‘shine’. It runs the gamut from slick-futuristic billboards to scratchy “Help me Obi-wan” messages. Often, very simple tricks are all it takes to get the job done. Material Artists can use a little Fresnel, scrolling UVs, Additive Blend Mode to accomplish a Hologram, and let Bloom handle the rest. Oh, and maybe have some of the vertices jitter around too. I’m just going to call these “vanilla” holograms, like the one below.

Do I have to even show this? It’s like the ‘Hello World’ of Holograms
Do I have to even show this? It’s like the ‘Hello World’ of Holograms
Otherwise, Pepper’s Ghost Tricks are really useful for Holograms too. Both Ghost Busters (1984) and Luigi’s Mansion (2001) use it! At runtime, we render the opaque mesh to an offscreen frame buffer, and during a later Pass, we sample the buffer to super-impose it back into the scene. The shader can freely distort it, set the opacity, and we never need to worry about self-sorting issues.

The Mesh is rendered into an a low-res offscreen buffer. A Post-Process Pass then "overlays" the Dragon into the scene, manipulating the UVs etc. As long as RT is captured with same VP matrices, it'll line up!
The Mesh is rendered into an a low-res offscreen buffer. A Post-Process Pass then "overlays" the Dragon into the scene, manipulating the UVs etc. As long as RT is captured with same VP matrices, it'll line up!
For many cases, that’s all that’s needed! However, these tricks are ‘obvious and old-hat’ to many gamers. The question I pondered: how can we break away from the static mesh, but still stay out of the realm of Particle Systems, which tend to be very versatile, and yet bloated and difficult to rein-in performance.
For games, it’s been very difficult to pull off actual 3D visuals that looks like its made out of 1000s of particles. That’s why most games have faked it with those “vanilla” hologram methods. For offline-rendering in film, "volumey" holograms are old hat: take as much rendering time as you want! However, for modern Game Engines, more dynamic options are becoming available thanks to Compute Shaders and GPU-Simulated VFX Systems.
I created my Volumetric Hologram as a “low-cost” and ‘low-effort’ solution within the scope of Environment Art. This method has versatility, compelling visuals, and good performance, but at the cost of potentially large memory footprints (depending on amount of detail). While it’s versatile, the visuals are limited in the “kinds” of holograms you can create with them. I feel this Volumetric Hologram pipeline perfectly personifies what Tech Art brings to the AAA table: a mix of artistic vision, optimization, and a lot of trickery to get the job done.
INSPIRATION
There wasn't anything specific that gave me the “aha” to implement a Hologram this way. I picked up ideas here and there as I worked on holograms and similar effects for my job over the years. I “accidentally” learned about exploiting degenerate triangles when working on VATs back in 2018. One year for Christmas, I received GPU Zen 01:: Advanced Rendering Techniques, and the first entry titled Attributed Vertex Clouds always stuck with me, although that technique is far more sophisticated. Lastly, I’ll mention the “challenge” I made to myself to come up with a better hologram. On a previous team, the Environment Art Lead Greg was reviewing our Map Hologram, and he really wanted the Hologram to “fray” and break apart at the edges, as if the signal was unstable. Unfortunately, the Map Hologram was just a Static Mesh with an additive Shader applied, and couldn’t break apart with its very low poly-count. I “plussed” that shader in different ways such as adding “projector tails” to it. But the idea of a hologram that met Greg’s wishes always stuck with me, and years later now its implemented. Anyway, its all part of a rich tapestry.
I always need to remind myself that little tiny experiments and dives can and will eventually pay off, even if it seems like a dead-end. Ya never know when a “trick” will come in handy, if even only as a jumping off point.
RENDERING ENGINE
Introducing The KaKonrad Engine, my very-own, from-the-ground-up Vulkan-API hobby Engine. At this time, I’ve implemented the foundational stuff like Normal Mapping, Shadow Mapping, and a data-driven Material System. Apart from the Holograms, I’ve also implemented features like Sparse Virtual Texturing, Volumetric Fog, and Kawase Bloom. The Kakonrad Engine also takes advantage of common open-source libraries such as Dear ImGUI for UI and stb_image for loading in images.

The engine has got a long way go, and honestly, I really wish I committed to investing in making a “playground” engine years ago. From here on out, I plan to utilize KaKonrad for all my future website projects, and I’m looking forward to sharing more about it as time marches on. Anyway, here’s some screenshots!
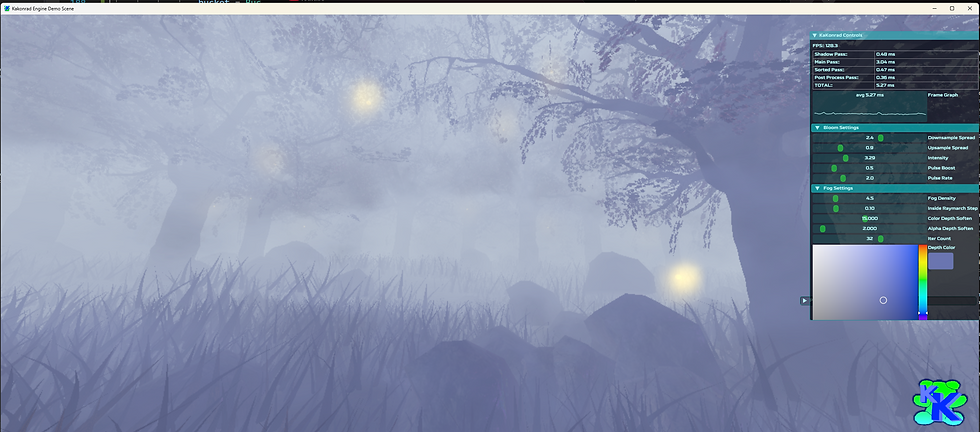
Forest Scene showcasing my Volumetric Fog, RVT, Kawase Bloom, and more
Super basic "Fur Shell" Rendering where one Draw Call renders the same Mesh N times with slight enveloping. I just think it looks funny

Runtime 3D Representation of various Sorting Algorithms driven by my GUI Menu
Forest Scene showcasing my Volumetric Fog, RVT, Kawase Bloom, and more
BREAKDOWN
The Volumetric Holograms are static meshes composed of hundreds of “Quads”. These Quads independently transform and have a unique ID so that randomization, animation, etc can occur. The four vertices that compose each Quad have identical data so they are in lock-step with eachother. The Hologram uses a standard Vertex and Pixel Shader, with minimal texture sampling and many bespoke functions to make the Hologram come to life. I have created a Houdini Digital Asset that will automatically convert regular static meshes into a volume of Quads. I’ll discuss the Data Storage more in the section discussing the HDA.
Most materials seem to do all their “cool” work in the Fragment Shader. Not so here; a majority of the work is done in the Vertex Shader. This is one of the secrets to why this “complex-looking” hologram is so quick to render. For demoing, I’ve added a lot of boolean flags to toggle features at runtime. If this was being shipped, those would be stripped out, or converted to #define blocks for the preprocessor stage. And yes, Quad may not be the best name for these elements, but I’m sticking with that name...
BACK TO THE ORIGIN
The secret to the Quads acting independently is that we’ve stored the Quad’s local position in the Vertex Color. With that, we can subtract the Local Vertex Pos from Quad’s Pos to bring the Quads to the Object-Space Local Position. When we’re at the Origin, we can freely transform the Quad (billboarding, dist scaling etc). The final step is adding back the Quad Pos.

Demonstrated in Houdini; Quads are able to be transformed "in-place" and even collapse to the center
Demonstrated in Houdini; Quads are able to be transformed "in-place" and even collapse to the center
The Quads are part of the same Static Mesh Draw Call, but have the illusion of independence. If this was done “conventionally” with a Particle System, each Quad would be it’s own Particle, with its own evaluation baggage. Even if it was GPU-driven Particles, the Structure Buffer might need to carry through a lot more data per Quad.
BILLBOARDING
Having the Quad face Player Camera at all times (along with the Animated Pattern) is what helps give the illusion that the Hologram is ‘fuller’ than it actually is. When the Quad is moved to origin, its rotated to face the camera.

Left:: Billboarding Enabled, Right:: Billboarding Disabled

Left:: Billboarding Enabled, Right:: Billboarding Disabled. Once the Mesh is rotated 90 degrees, its very noticeable

Billboarding Toggled while Donut Spins Around
Left:: Billboarding Enabled, Right:: Billboarding Disabled
The shader has two ways that the Quads can look towards the camera; from Quad’s Center or the Object’s Center. The main reason for two methods is primarily for when the Camera is up-close or even inside the Hologram. At that distance, the illusion of the Hologram breaks down a bit. I typically have Distance Scale tuned such that the Quads collapse down long before the billboard illusion breaks. Take a look at the animated gif below to see the difference:

As camera zooms into Hologram Cube, Billboarding Mode is toggled. Notice how Quads change their orientation which may be desired as getting closer
As camera zooms into Hologram Cube, Billboarding Mode is toggled. Notice how Quads change their orientation which may be desired as getting closer
Billboarding is not strictly necessary, and in-fact it can be a valid “style” of hologram that’s view dependent. Kind of like one of those 3D LED Matrix Cubes! I guess it depends if the hologram tech is meant to be diegetic or not in the in-game universe. Billboarding does not rotate the Normals.
DEGENERATE VERTICES
So the Volumetric Hologram is composed of hundreds of Additive overlapping Quads. Sounds like a nightmare of overdraw….so how can it be so performant? The main secret to its low runtime cost is by forcing the vertices in the Vertex Shader to be degenerate. When at origin, the vertices are collapsed so the Tris would have zero-area. This ensures a majority of the vertices don’t make it to raster, thus never making it to the Fragment Shader. This zero-area discarding is part of the GPU’s primitive assembly stage; quite a nifty exploitation!
I wanted to share an example image of degenerate vertices. Sadly, RenderDoc and other profilers don’t seem to have a simple debug-view to directly notify you that Vertices have become degenerate and that Triangles are zero-area. For the future, I’d love to add a Geometry Shader that would provide this debug information (by outputting the area of the would-be Triangles coming in).

When the three vertices of a triangle all have identical pos data in the VS Output, that's a guarantee that it'll never make it to the rasterization stage
When the three vertices of a triangle all have identical pos data in the VS Output, that's a guarantee that it'll never make it to the rasterization stage
Some folks may ask:: what’s the problem with getting to Fragment Shader anyway? To cut to the chase; pixel count gets alot bigger than vertex count! Yes, that is way over-simplifying the Render Pipeline; but its just a general guideline.
Let’s say there’s a Hologram comprised of 200,000 Quads, which would equal 800,000 vertices. Thats a lot of vertices to process...but that’s still way below the ~two million pixels in a 1920x1080 Frame Buffer. This mainly becomes an issue when the primitives are large, and close to full-screen. I hope this comparison image helps spell it out.

Showcasing that Alpha-Fillrate can be a death-nail to performance. Radically increasing vertex count to circumvent it, is a viable strategy for optimization
Showcasing that Alpha-Fillrate can be a death-nail to performance. Radically increasing vertex count to circumvent it, is a viable strategy for optimization
Since the Hologram has so many small triangles, its especially important that we discard many when at a distance because once triangles get to the size of one pixel on-screen, it greatly affects performance post-vertex shader stage. I often “joke” with Artists; sometimes one polygon is a lot more expensive than thousands of polygons!
VIEW CULLING
Another key optimization is culling the Quads. Since we have Billboarding enabled, we cannot rely on traditional hardware backface culling (front-faces are always facing the camera now). The beauty is each Quad is unattached, and thus we perform our own culling test in the Vertex Shader!

Previewing how the Quads will be culled via the HDA's Debug Mode. Culled Quads can either be represented by Red or Zero Opacity

In Houdini, the Yellow Arrow is driven by a slider to simulate the Camera facing direction
Previewing how the Quads will be culled via the HDA's Debug Mode. Culled Quads can either be represented by Red or Zero Opacity
While we billboard the Quads to face the camera through transformation, we keep the input Normals (from the HDA) in the original facing direction. That way, the Quad Normal maintains the same Normal as if it was still a regular static mesh. We do a simple Dot Product Test with the original Normal and View Direction. The Dot Product result is stored as a boolean that multiplies against the Vert Pos when we’re at origin; collapsing if the result was less then zero (or whatever chosen threshold).
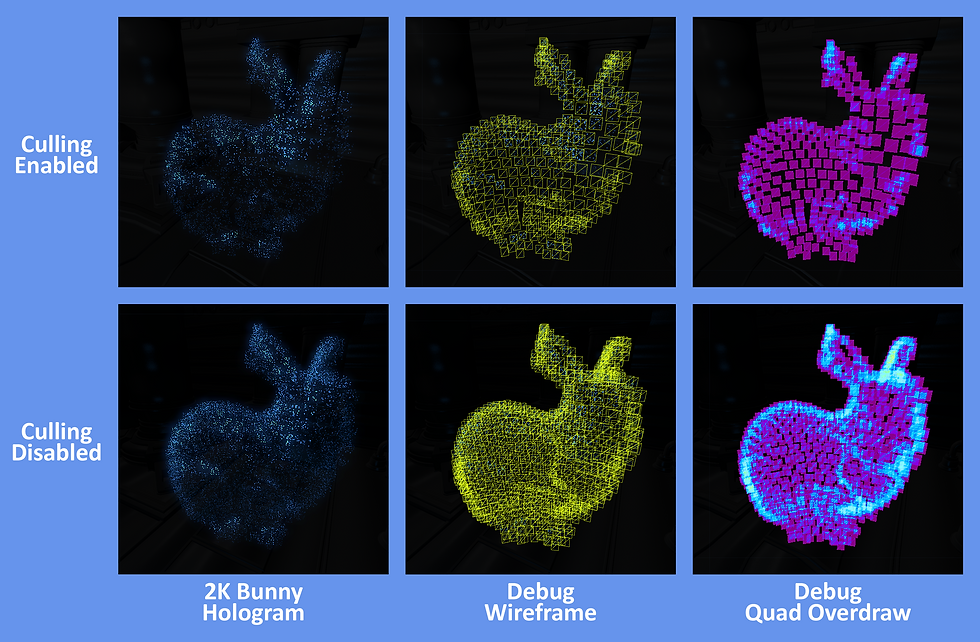
With culling disabled, the Hologram feels "fuller" but the overdraw gets bad. With tuned scaling, the Bunny can still look very good with culling enabled
With culling disabled, the Hologram feels "fuller" but the overdraw gets bad. With tuned scaling, the Bunny can still look very good with culling enabled
The goal is for the holograms to feel "volumetric" but with Billboarding, and tuning the other visuals just right, we can get away with culling a great deal of Quads and the hologram still looks full enough. In fact, culling can help with the readability quite a bit, especially when Additive Blend Mode is used. Less Quads also means less overdraw.

Slider adjusts DotProduct Pass/Fail Threshold, whether Quads are culled

The Culling tests against Quads in the original pos, so fringe undulation and animation do not affect this test
Slider adjusts DotProduct Pass/Fail Threshold, whether Quads are culled
EMULATING MORE PARTICLES
The impression is supposed to be that our Hologram is composed of tens of thousands of “particles”. While, we can safely render thousands of Quads, we can also take advantage of an Animated Texture on the Quad surface to give the impression that our Hologram is made of more “particles” than there actually are. Paired with Billboarding, and proper tuning, it can be quite convincing.
Each Quad uses ID to offset looping animation timing. The noise helps create the illusion that the Hologram is comprised of tiny "photons" instead of Quads
Texture is sampled once, but the three channels are put through fracts and clamps to create the Noise pattern
Each Quad uses ID to offset looping animation timing. The noise helps create the illusion that the Hologram is comprised of tiny "photons" instead of Quads
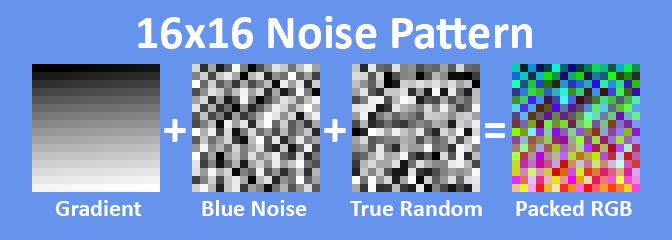
There’s many solutions for creating this noise, but I chose to drive this with a single texture. I created a 16x16 packed Noise Texture, the perfect resolution for representing 256 unique values. The fragment shader samples this texture, with the Sampler set to Nearest-Neighbor and Repeating. Each color channel has unique values stored:
-
Red Channel == Ordered Gradient
-
Top-Left to Bottom-Right, Values from 0 to 255
-
-
Green Channel == Even-Distributed Random
-
Values are jumbled (Blue Noise?) so like-values are not stored nearby
-
-
Blue Channel == True Random
-
Values jumbled around, no rhyme or reason
-
-
Alpha Channel == Mask
-
Optional “Punch-Card” to create shapes
-
With these RGB values, we’re able to give the Quad surface “randomized” animation, giving the impression of multiple “particles” flickering. There’s limitations to the randomization. Quads will eventually repeat each other, and keen eyes will see the looping pattern. We do two things to seed the animated noise. We use the Quad’s ID Value (stored in Vertex Color) to offset the time so Quads do not animate at the same start-time. Also, during generation, the VolumetricHologramConverter HDA shifts the UVs of each Quad around.
Notice the two GIFs side-by-side:: the Torus Hologram is composed of 240 Quads, but the Animated Noise Pattern really helps evoke an impression of many more “particles” than there actually are. In the GUI, I’ve added debug sliders to control the tiling of this Noise Texture. To my surprise, tiling values less than 1x often give more consistent, convincing illusions. When the tiling rate is too high, and the Quads are relatively small on screen, it becomes more noticeable that they are, in fact, just Quads.
STROBING
This Feature serves two purposes: mainly to amortize the cost of the Hologram so only a fraction of the Quads are rendered per Frame. The secondary effect is adding visual flare: an “unstable flickering” akin to “punk sci-fi tech.” Like most of the features, this is handled completely in the Vertex Shader. Sadly, this is the hardest feature to give justice to through PNGs and animated GIFs. Take a look at this example, and trust me that it looks better when running at 60 fps on your computer. The main takeaway is that only a portion of the mesh is rendered per frame, but its so fast that the brain blends these discrete frames into a continuous shape.

The slider changes the UV Repeat Rate for the Noise Texture. The Tiling cannot be pushed too far otherwise "Not a Quad Illusion" is less convincing
The slider changes the UV Repeat Rate for the Noise Texture. The Tiling cannot be pushed too far otherwise "Not a Quad Illusion" is less convincing
Impossible to do justice via Animated GIF, only half of the Quads are rendered per frame. At 60 FPS, its hard to notice

Amount of Strobing "Slices" is controlled by a Slider. Strobing at this rate looks like the Hologram is intentionally cut into "sections"
Impossible to do justice via Animated GIF, only half of the Quads are rendered per frame. At 60 FPS, its hard to notice
The Strobing is driven by an animated gradient mask along the Y-Axis in Object-Space. Quads with gradient values close to zero will be collapsed while the rest remain. I’ve exposed variables that widen the gradient as well as change the amount of gradient “slices”. Strobe Slice is the Y value of the mod() function. The idea is that the larger the value, the more “slices” you would see in the Hologram as portions actively turn on and off. I’ve found that the sweet spot is having roughly half the Quads visible and half collapsed by Strobe. This feature cuts rendering costs in half, but can also be a little off-putting. Because its hard to capture, I've left it disabled for a majority of this article. With Interior Quads, the Strobing looks kind of like science-class segmentation!
DISTANCE SCALING
There’s a reason why Graphics Engineers fear Transparency, and its because of overlapping layers and Alpha Fill Rate. My Volumetric Holograms have hundreds of camera-facing Quad...it sounds like a death nail of performance. It's actually very manageable, its all about being how many Quads make it to the Fragment Pipeline Stage. The Distance Scaling feature automatically scale the Quads down as the Camera approaches. It's super simple, the length() is measured between Quad Pos and Camera Pos. Once the distance value reaches less then 1.0, the Quads start uniformly scaling down. They can be scaled until completely collapsed, ensuring they never become screen-filing nightmares.

Tuned just right, the Dist Scaling looks like an artistically-driven fade-in. Of course, most important part is avoiding Alpha-Overdraw

Scaling based on distance from Quad World Pos to World Cam Pos. LODing out the detail "just works" since all Quads of the mesh are unattached
Tuned just right, the Dist Scaling looks like an artistically-driven fade-in. Of course, most important part is avoiding Alpha-Overdraw
In the GUI, I’ve exposed sliders to adjust two factors: the distance before scaling and a power curve that controls how gradual the scaling down is. For some Players, maybe the scaling comes off as blatant LOD adjustment. I think it can easily slot into a diegetic Sci-Fi explanation. It certainly feels more “natural” then a dither LOD transition, or God forbid pop-in! With Distance Scaling enabled, the Player Camera can freely get up-close to the hologram without impacting performance. The scaling might even make the hologram feel a little interactive.
HOUDINI TOOL
Now that we got the core features out of the way, let’s look at the Houdini portion of the pipeline and how it works. We’ll return back to the Hologram Shader and its features afterwards. My Houdini Digital Asset is called the Volumetric Hologram Converter.

Static Mesh files (fbx, abc, obj, etc) are taken as Input and converted to a Volume of “Quads”. Each Quad is embedded with data through the Normals, UVs, and Color of the Vertices. The HDA has many parameters including setting Output Folder, Hologram Name, and size of Quads. In addition, the HDA has several Debug Modes to help visualize Culling, Interiors, and the optional Burst Mode. In the Download ZIP below, in addition to the HDA, I have all the parameters and Debug Modes explained further. Take a look at the timelapse below to see the Stanford Bunny converted to a Volumetric Hologram-ready mesh.

Timelapse of bringing in the Stanford Bunny, tweaking settings, and exporting, ready for the game engine
Timelapse of bringing in the Stanford Bunny, tweaking settings, and exporting, ready for the game engine
FILE FORMAT
Because its super-straight-forward, lightweight, universally-supported etc, I use OBJ format for my KaKonrad Engine, and for the VolumetricHologramConverter. That said, I use a “cheated version” of the format. OBJ format does not officially support Vertex Color, but many DCC packages append RGB Vertex Color after Vertex Position. Vertex Color is "unofficial" but widely adopted, kind of like winning the pot when landing on Free Parking in the game of Monopoly.

Mesh is exported into OBJ format, where the data is packed into specific components such as the UV Channels. Vertex Color is used which is not official to the OBJ standard; not all DDC software recognizes OBJ color
Mesh is exported into OBJ format, where the data is packed into specific components such as the UV Channels. Vertex Color is used which is not official to the OBJ standard; not all DDC software recognizes OBJ color
In addition, I’ve further expanded my OBJ format to hold multiple UV Channels for extra optional features that I’ll discuss later. The HDA Tool offers exporting out a "regular" OBJ file (Pos, Normal, UV plus Vertex Color). If Burst Mode is enabled, instead of regular UVs, my non-conventional OBJ format is used with packed UVs in two float4s. Supporting only OBJs is a big limiting factor to my hologram pipeline, and for the future, I'd like to adopt a format that officially supports multiple UV Channels, Color, and Skinning Data.
STORED DATA
Each Quad is composed of:: Two Triangles:: Four Vertices. Each of the four Vertices stores the same Data. We use Vertex Position, Normal, Color, and Texture Coordinates, but pack them with alternate data. Take a look at the chart below to see a summary of the entire pipeline, and what kind of data is used throughout.
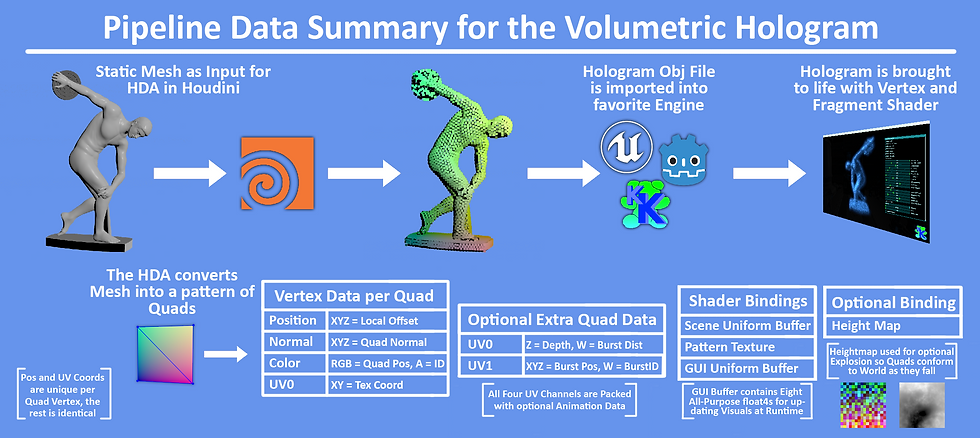
A breakdown of the pipeline, the data contained per Quad, and what gets used by the shaders
A breakdown of the pipeline, the data contained per Quad, and what gets used by the shaders
Vertex Position is just the regular vertex position of the Quads, and the only data that is not shared between the vertices.
Vertex Normals store the averaged Normal of the Static Mesh’s surface. We utilize Houdini's Attribute Transfer Node to accomplish this. With this averaged Normal, the Hologram can simulate lighting, culling etc as if it was still the regular static mesh. Even when the Quad count is below 500, the surface details captured from the original mesh still shine through.
The Vertex TexCoords store UVs to sample the animated texture. In addition, for extra features such as Burst, we use up to four UV channels to store the extra data. Game Engines often only support one set of Vertex Colors, but multiple UV Channels is very common.
Vertex Color stores the Quad’s local position, while Vertex Alpha stores the Quad ID. In many formats, Vertex Color is normalized as 0.0 to 1.0. So in order to store values beyond that range, Houdini compresses the Position and ID. The Vertex Shader then decompress the stored RGBA to get the original value. We share the same Decompress Constant (in my case 10.0f) between Houdini and the runtime Vertex Shader. Single-precision float values will not lose accuracy until values past sixteen million, so we don’t have to worry about precision loss when we re-range position into 0.0 to 1.0 domain.
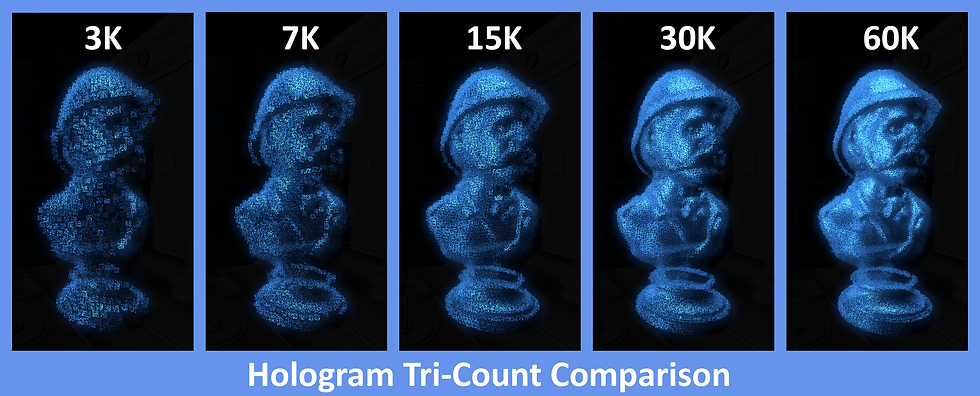
Comparing the SafariMan Hologram exported with increasing numbers of Quads. I'd say 15K is the real sweet spot. Culling has been enabled
Comparing the SafariMan Hologram exported with increasing numbers of Quads. I'd say 15K is the real sweet spot. Culling has been enabled
MEMORY FOOTPRINT
Thanks to all the aggressive culling, performance cost is very low. The main factor to consider is the memory footprint. A Volumetric Hologram (without Burst Mode enabled) requires 48 Bytes per Vertex. Let’s say we generated a Hologram of 64,000 Quads. Each Quad has four vertices...totaling ~12.3 MB output file. For test scenes its fine, but for a shipping title, mesh files like that can add up quickly, especially for handheld platform with 8 GB or less vRAM. Like all show-stopper visuals, Volumetric Holograms placed into levels would have to be used responsibly. God forbid you get a Designer who prototypes every item pickup to be a 64k Hologram!
For the scope of this project, I haven't focused on reducing the memory size. That said, 48 Bytes can absolutely be reduced. For example, using Half16s for some of the Stored Data. Vertex Normals can even be compressed into a single Uint32, with each component a single byte. These common methods could reduce the Vertex Data footprint by at least 33%.
However, even if the data was decreased, its a shame that each vertex of the Quad (except Position) has identical data. This is the biggest limiting factor of doing this through the Vertex Shader. A Compute Shader pipeline would absolutely cut down on the memory footprint. I look forward to revising this project with the goal of memory conservation.
INTERIORS
The HDA TooI gives the option to generate a Volumetric Hologram with an “Exterior” surface only, or to generate Quads inside the volume as well. These “Interior” Quads exponentially increases the Poly-Count because it takes so much more Quads to fill the space. I found that while adding Interiors literally makes it volumetric, investing more Quads to the Exterior exclusively ends up being more worth it. Interior Quads are most useful for when “bursting” the Hologram is intended, or if you plan for the Player to literally walk through the Holograms. When the Interior Quads are noticeable, it's great, but readability often suffers, especially in Additive Blend Mode.

Generating Interior Quads makes the hologram actually "volumetric". It certainly can change the look and feel. But there's also a danger of being hardly noticeable at all, and investing more Quads to the Exterior Surface is more worth it
Generating Interior Quads makes the hologram actually "volumetric". It certainly can change the look and feel. But there's also a danger of being hardly noticeable at all, and investing more Quads to the Exterior Surface is more worth it
The Interior and Exterior Quad Count can be independently set, and I recommend having the Interior Count be dramatically less dense than the Exterior. For my example Holograms, I have the Quad Count between Exterior and Interior at ~50/50 split, but the Interior is less dense as a result. Interiors become especially useful for Bursts that I’ll talk about later.
For Burst Mode, we happen to have Houdini store the Depth of the Quads into UV0.z (aka U coordinate of UV Channel 1). All Exterior Quads have a Depth value of 0.0 while Interior Quads have values greater. With that, the Fragment Shader is able to distinguish between Interior and Exterior Quads; thus we can give Interior Quads their own hologram color!
ADDITIVE VS TRANSPARENT
Sci-Fi Holograms are often depicted as thousands of emissive phosphors recreating shapes in 3D-Space. With that in mind, for “realism” we’d want the holograms to be two-sided and Additive Blend Mode. However, it depends on the desired visual aesthetics, readability, and consistency (of course rendering budget too).
Below, I’m showing two GIFs of two Holograms side-by-side; Additive on the left, and Transparent on the right. With culling being toggled, the striking impression, and readability changes. For Additive Blend Mode, culling absolutely helps readability, especially in an extremely bright environment. Transparent Blend Mode is more flexible as lighting/culling conditions change. Notice how the stacked Quads lead to Opacity values accumulating to one, thus making the hologram on the right appear opaque, especially on the fringe.

Here's an example of Additive and Transparent Holograms, and how they present as the background gets darker/lighter

Additive Left and Transparent Right. The former gives off a more convincing traditional Sci-Fi, light emitting hologram
The Interior Quads (dyed Red) give different challenges for readability, especially when the Quad scale shrinks and grows
Here's an example of Additive and Transparent Holograms, and how they present as the background gets darker/lighter
The two points I’m trying to make are: the optimization features can also strongly benefit visuals, and that both Blend Modes have their place for being used with the Volumetric Hologram. If the environment is brightly lit, Transparent Blend Mode might be a better fit. For a majority of this article though, I’m presenting as Additive since we’re in a dark scene, and I want the visuals to appear striking.

RenderDoc's Alpha Overdraw ViewMode is used to showcase how quickly scaling the Quads can cause nightmare levels of Overdraw
RenderDoc's Alpha Overdraw ViewMode is used to showcase how quickly scaling the Quads can cause nightmare levels of Overdraw
ALPHA OVERDRAW == SOFTNESS
I just mentioned again the dangers of Alpha Overdraw...but what if we do it on purpose? Scaling-up the Quads so that they overlap a tiny bit can help make the Hologram feel “softer” especially for Additive Blend Mode.
When tuning for a specific look, it's very easy to accidentally have too many Quads overlap, especially if all the optimization flags are disabled. Overdraw can be a death-nail for performance. It may be better to keep scale on the lower end. The default size of each Quad is set when generating in the HDA. The GUI has parameters to increase the minimum and maximum size at runtime. Most of the Feature Flags (Strobing, View Culling, etc) also scale the Quads at runtime (usually down to zero). For performance, scale of the Quads is usually more important than number of Quads.

The Hologram's Quads are scaled. The more overdraw that occurs, the "softer" the hologram becomes. Helped by Bloom too

Safari Hologram; scaling up the Quads, adds too much overdraw, but a little bit of overlap tied with distance scaling might be acceptable

Example of overdraw "softening" with the Donut remaining still
The Hologram's Quads are scaled. The more overdraw that occurs, the "softer" the hologram becomes. Helped by Bloom too
The overlapping Quads cause horrible Overdraw, but combining this with Distance Scaling, Aggressive Culling etc can help mitigate the cost and make perf still acceptable. A smarter approach is to probably taking advantage of Post Process Passes to selectively soften regions of the screen to get similar results. That said, my hologram examples do often take advantage of overlapping to enhance the visuals, and its valid if done with intent.
FRINGE UNDULATION
I mentioned at the start that this project was partially inspired by me trying to “plus” hologram tech I created on past games. The Fringe Undulation features adds sinusoidal offset to the Quads to help give the impression that the “sci-fi transmission” has interference and that the integrity of the 3D Volume is not 100%. I call the feature “fringe” because the Quads affected are view-dependent, at the edges of hologram. The Quads are masked by a Fresnel Function, with the GUI's “Fringe Expo” parameter being used in the pow() function to loosen or tighten the gradient mask. Take a look at the two holograms below, with Fringe Undulation disabled on the Right Mesh.

Side-by-Side of Hologram with and without Fringe Undulation enabled. It helps convey the "steadiness of the signal"

For Right Side:: Green indicates Quads that are being undulated

The Fringe Undulation Power Curve is adjusted as the Hologram spins
Side-by-Side of Hologram with and without Fringe Undulation enabled. It helps convey the "steadiness of the signal"
Let’s compare this to the “vanilla” hologram. The silhouette of a “regular mesh” definitely cannot break apart like this. Fresnel can take “vanilla” a long way in giving the edges a similar look with an additional animated texture, but the mesh cannot "truly" break apart like it can with our volume of Quads. This ambient animation adds dynamism that will be further expanded in the sections below.
LIGHTING
The Hologram is intended to be Emissive and Unlit. However, the details of the Mesh are very hard to make out without some definition. I’ve added local “fixed directional” lighting to highlight the holograms extra surface detail. As I mentioned with View Culling, we already have the original meshes’ Normals to work with. We run a N * L Dot Product test for both directional lights. The final lighting value scales the final Alpha rather than final Color. Originally, I wasn't planning on having this, but take a look at the differences below:
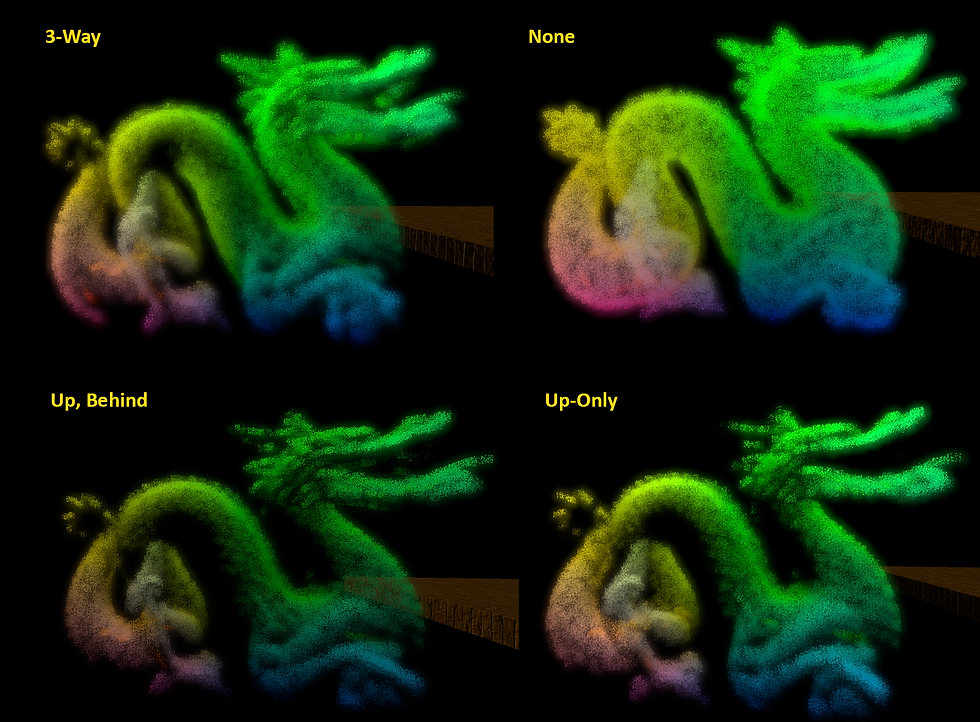
Fixed Light Directions in the Shader are Dot Product tested with the Quad Normal helping to expose detail of the original Mesh. I tried different variations to get out the most detail
Fixed Light Directions in the Shader are Dot Product tested with the Quad Normal helping to expose detail of the original Mesh. I tried different variations to get out the most detail
The Lighting is calculated in the Vertex Shader, effectively per Quad. While cheap, in the future, I'd like to add options to have this pre-calculated. One option I wanted to explore was baking the light intensity into the vertex data coming out of the HDA. If our vertices don’t have enough room to store more data, perhaps we have Houdini bake the light values out into a Texture that could be sampled in the Vertex Shader instead. I suspect though that our Dot Product Tests in the Vertex Shader is cheaper than a Light Map sampled. Rather than having fixed-light directions, scene directional light could also be passed in.
INTERACTIVITY
Alright, now we’re getting to the real ‘power’ of Volumetric Holograms:: Animation! Because we’re dealing with a 3D Field of standalone Quads, each with their own ID, we can create tons of animation through bespoke functions. This is going a step further than the Fringe Undulation. I can imagine these as the “intro” and “outro” animations of the holograms coming into the scene. Perhaps if the Player “shoots” the Hologram it reacts at key locations. All of these are done in the Vertex Shader. Writing these Animations in the shader makes them a lot more rigid than, say, a Particle Generator with modular evaluators. But this makes the effects ultra efficient. If a project has very specific dynamic visual needs, there's so much benefit for keeping it inside the shader as “fixed-functions”. Anyway, in the ImGUI, I’ve exposed parameters to switch between these animations, and a universal slider to scrub from 0.0 to 1.0. I'm showcasing four animations below as examples of what can be done, but there's plenty of other animation possibilities!
TORNADO
The first Animation I want to show is the simplest; Tornado. Three layers of sin() + cos() pairs and a gradient mask cause the Hologram to gradually break apart into a vortex of chaos! The gradient mask (fixed along the Object Y-Axis) drives each Quad to gradually lerp from its default position, to its final oscillation. Again, these are bespoke functions. If more versatility is needed; we could pass a user-controlled vector that specifies which axis we want the tornado to break apart from. I especially like how the Red Interior Quads mingle with Blue Exterior ones.

Quad IDs are used to slightly offset trig function phases, creating this swirling chaos. The Inner and Outer Quad Colors mixing is extra fun
Quad IDs are used to slightly offset trig function phases, creating this swirling chaos. The Inner and Outer Quad Colors mixing is extra fun
All the animations I'm demonstrating here are driven by the same 0-1 slider. However, they can easily transition to being more dynamic. For example, the Quads being driven by a dynamic wind simulation; the Quad 0-1 intensity can be driven positionaly to only affect specific areas of the hologram.
BURST
The Burst Animation divides the Hologram into several chunks, and “bursts them” one at a time, all through the Vertex Shader. The HDA has several options to specify how many bursts, and I added debugging views too! This gives the impression of a very dynamic effect, but its all “fixed-function” thanks to 16 Bytes of extra data encoded into the mesh. Take a look at this HDA time-lapse with the Stanford Bunny being tested for Bursts in Houdini.
Essentially Voronoi Noise, random selection of points are scattered inside of the mesh, and each Quad stores the distance to the nearest point
Essentially Voronoi Noise, random selection of points are scattered inside of the mesh, and each Quad stores the distance to the nearest point
The Burst Animation requires extra data per vertex. My KaKonrad Engine supports four UV Channels, and so I’ve extended the OBJ format as well. For Burst, I’m using all four UV Channels to store the additional data needed to drive the bursts. The extra data is: three components for Burst Pos, one component for Burst Distance, and lastly one component for Burst ID so the Quad knows which “Burst Chunk” it belongs to. Currently the UV Channels are 32-Bit components, but all this Burst Data could easily accommodate into 16-Bit channels.

The Burst data is encoded into the vertices, the Quad ID offsets when each burst point occurs

The cadence and size of the bursts can be adjusted to give different impressions
The Burst data is encoded into the vertices, the Quad ID offsets when each burst point occurs
For the future, I could have the Game Thread hold an array of all Burst Points output from the HDA. The Player could shoot the Hologram at a specific location, and the Hologram could chain-reaction burst at the nearest burst point with a sphere-ray test. With the CPU and GPU in lock-step, the Burst Animation would become a dynamic gameplay feature.
GRIDIFY
This system takes all the unique Quad IDs and converts them to an NxN grid. A four-point slerp gives a unique transition as the Quads convert from a Grid of phosphors into the true shape (or vice-versa). The Grid could also work as a “scanner effect” as the hologram is “3D-Printing” into existence. That transition especially gives, at first glance, an impression that the hologram is not a static mesh, but something more complicated.

The Quads unique IDs translate to XY coordinates on a Grid Plane

KaKonrad's ImGUI Animation Slider drives between 0% to 100% Gridify

The bezier curve adds alot of flair when sliding from Grid to Mesh Shape
The Quads unique IDs translate to XY coordinates on a Grid Plane
For this article, I limited the Gridify to a flat 2D Rectangle, but all kinds of other primitives are easily possible to transform the hologram into. It's all about which function we run it through. It's essentially a Mesh-Primitive blendshape.
EXPLOSION
The final animation is the Explosion. It was very tricky for me to drive the entire sequence only in the Vertex Shader without adding heavy amounts of extra data. Guess what, there is no additional data here! While the Burst Animation required more data stored in the vertices, Explosion has an optional extra texture fetch. Each Quad is basically “fancy lerping” its way to its final position. For “true dynamic” simulations, each particle typically has its own parameters to control time, gravity, and even states. In only working with Quad ID and Position, it was difficult to have the Quads transition from kinetic rise, fall, bounce, and the rest. With a "blink and you'll miss it" sequence, I hope it appears convincing enough.

The Stanford Bunny is blown to bits, all driven by one main function in the vertex shader

The explosion direction is determined by the Quad Normal and Quad ID seed influence
The Stanford Bunny is blown to bits, all driven by one main function in the vertex shader
I wanted to further enhance the Explosion animation so it looks more complicated than it actually is, and to further justify all these Quads. So I added the option for the fallen Quads to conform to the terrain. The Vertex Shader reads the Height Map using Local-Space XZ as the coordinates. Each Quad’s final position of the “fancy lerp” is the bottom bounds Y value minus the sampled height (multiplied by a scalar). Conforming to the terrain is very simple because we only need to worry about a single dimension. I'd love to try and have the Quads post-explosion conform to 3D-Space utilizing Distance Fields.

For added "groundedness" the Vertex Shader has each Quad sample the Height Map so the final pos lands on the ground beneath

These three explosions observed at a distance. Notice how Quads exploding beyond Extent of Terrain "fall off" the edge of the world

Here are three explosions from an older build in slower motion. The max height, extents etc can all be tweaked
For added "groundedness" the Vertex Shader has each Quad sample the Height Map so the final pos lands on the ground beneath
Once again, the “independent” Quads achieve what a “vanilla” hologram cannot. I know someone might ask...why are the holograms exploding anyway? Well, maybe our game universe has Sci-Fi Rabbits comprised of a nano-bots, and the molecular-stabilizing field malfunctions, causing the rabbit to melt down.
STRESS TEST
Alright, I’ve mentioned performance throughout this article. I want to show a stress test I ran to help demonstrate how much the optimization flags affect GPU timing. This project was developed using my RTX 3070 TI. Using my desktop for measuring perf wouldn’t really cut it. So for a low-spec machine, I’ve stress-tested the Volumetric Hologram using my Dell Inspirion 16 Laptop with a GeForce MX550 Mobile Chipset. According to Passmark.com, this mobile GPU is around the same power-level as my old Radeon HD 7870 (The video card I used to play Deus EX Human Revolution when it launched in 2012…). On the laptop, Kakonrad Engine was displaying 1920x1080, and the goal was to get the Sorted Pass as low as possible while still having very pleasing results. Take a look at the chart below and the performance as the Flags were enabled and disabled.
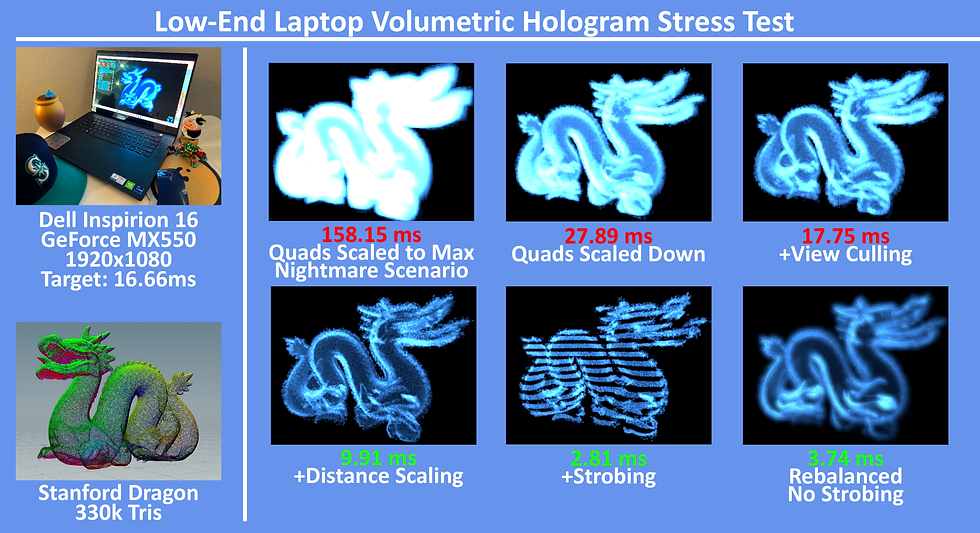
Comparing performance of Volumetric Hologram with features enabled/disabled on videocard power roughly equivalent to a mid-range card from 2012
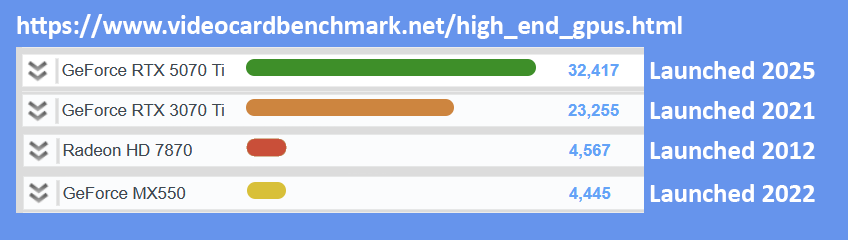
According to Passmark, the mobile chipset sits just below my old 7870. For reference, the benchmark values for the 3070 TI (used for most of article) and a modern 5070 TI card
Comparing performance of Volumetric Hologram with features enabled/disabled on videocard power roughly equivalent to a mid-range card from 2012
At near fullscreen, alpha overdraw was massacring performance. Slowly as I enabled the various optimizations, we got below 3 ms on this ancient video card. The final image on the bottom right, was myself bringing performance up a little to bring back more visual flare. Game dev is a balance after all. 160,000+ Quads is definitely overkill, but as a "worst case scenario" I hope that it verifies the Volumetric Hologram viable and a game-ready workflow.
SHARING THE FILES
Please feel free to download this zip file for the Volumetric Hologram. It contains:
-
The core hlsl files
-
VolumetricHologramConverter HDA
-
Demo Mesh
-
Some Documentation files
-
The KaKonrad Hologram Demo Program
The hlsl files are not drag-n-drop, and have several dependencies with the KaKonrad Engine. The body of the vertex and fragment shader is the main portion I want to share. I hope this will provide a great jumping-off point for folks who are interested in trying something similar in their own game engines. The logic itself can be rather 1-to-1 implemented in common AAA Game Engines Material Graphs. As I mentioned earlier, the Hologram shader was built for modularity and demonstration, with many debug parameters and flags. For shipping titles, many of these debug parameters could be stripped out or converted to preprossessor defines. The HDA was created with Houdini 20 Apprentice, and I hope it’s a solid learning reference. The biggest downside is that I only added support for OBJ export. Looking forward to hearing back from fellow devs on how we can improve this pipeline further.
CONCLUSION
This concludes my presentation of the Volumetric Hologram. Throughout this article, I’ve mentioned several places where the system can be expanded and refined. I hope at the very least, this inspires folks in their own explorations and R&D; drive compelling visuals with lean solutions. All the holograms I used to showcase the features were static meshes. For the future. I’d very much love to adapt this for AAA skinned characters one day. Also, I’d love to see how this pipeline would fare as a compute shader. They’re becoming more accessible to the “editor-level” of game engines.
I know my implementation of the Volumetric Hologram is not noteworthy for the visuals alone; there’s gifs on ArtStation that would run circles around my Billboarding Torus or exploding Stanford Bunny. That said, if there’s a AAA project, that needs to run 60 fps on a lower-end Handheld device...and the scene is already filled with multiples enemies and exploding barrels...I hope this article comes in handy with what can be possible without hurting the CPU or GPU too much. Thank you so much for your time, I appreciate you reading.

One last demonstration of the Volumetric Hologram and SafariMan: the original mesh can be found at: https://free3d.com/3d-model/bust-safari-hunter-with-hard-brim-hat-v1--356617.html
One last demonstration of the Volumetric Hologram and SafariMan: the original mesh can be found at: https://free3d.com/3d-model/bust-safari-hunter-with-hard-brim-hat-v1--356617.html